How to Draw a Bird: A Complete Step-by-Step Guide for Beginners
-
Khalid Al Mansoor
- . November 24, 2025
- . Update: November 25, 2025 3:22 pm
One of the best methods of perfecting your sketching skills is to learn how to draw a bird particularly when you are a beginner. There are numerous shapes and sizes of birds and it is in their structure that their outlines, proportions, shading and textures are best studied. This instructional manual details a simple step-by-step process of how to draw a bird by subdividing the process into simple forms. It is the same whatever species you are drawing, sparrow, parrot, crow or any other. As you practice and observe your drawings of birds will be more realistic, detailed and expressive.

Understanding Basic Shapes of a Bird
Before understanding how to draw a bird, one should begin by looking at the simple construction of a bird before making inferences. There is hardly a bird that could not be reduced to three primary forms, namely, an oval form of the body, a circle of the head, and a triangle of the beak. This base will assist you in keeping the right proportions and also in ensuring that your drawing does not appear unbalanced. Take some few seconds to imagine your bird in shapes. This is a less complex technique which makes the drawing process to be much simpler particularly to novices who may not be yet confident in the ability to draw.
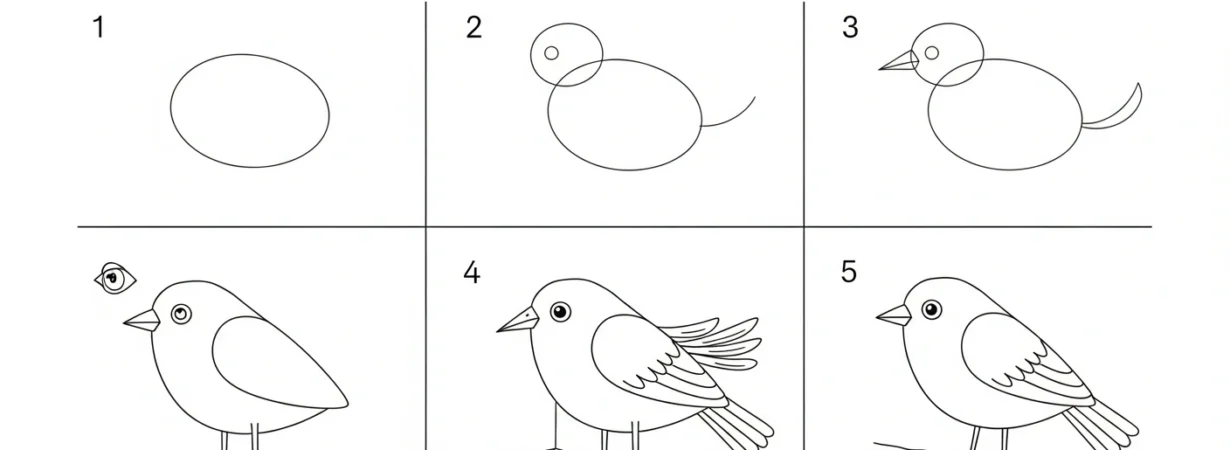
Step 1: Draw the Head and Body Outline
Start with a tiny circle that is the head. Below it, there is a larger oval of the body. These two figures are supposed to join together and make a natural position. And sit your bird, And with the oval lean. When it is flying, the oval should be stretched horizontally. These would be put in to add motion and life into your drawing. Do not work hard–do your strokes lightly so that they may be corrected afterwards.
Step 2: Add the Beak and Eyes
Draw a triangle or a curvy shape of the beak. There are various styles of beaks among different birds, wide, long, short, or curved, therefore, make your choice according to the kind of beak you want to draw. Add a small circle that represents the eye and it is placed slightly higher than the line of the beak. A small white space that was left inside the eye also makes the drawing look real. These are just but simple details which add character and personality to your bird sketch.
Step 3: Draw the Wings and Tail
Next include the wings in elongated and curvy forms that take after the body. Depending on the pose, the wings may be folded or be open. In the case of folded wings make a gentle line in the side of the body. In flying birds, wings are long and wide. then make the tail with the help of straight or slightly curved lines. The tail shapes are also different- some birds have long pointed tails and others round ones.
Step 4: Add the Legs and Feet
Birds possess thin delicate legs, thus, draw two straight lines along each leg. Three toes on the front and one upon the back. In case your bird is sitting in a branch then bend the toes in that direction. Ensure that the legs are proportional do not make them too thick or too long.
Step 5: Refine the Outline and Add Feather Details
After having the basic structure prepared, perfect the lines. Additional shapes should be erased and the outline should be smoothed. decorate the body, wings, and tail with feathers. Small birds will be drawn in short strokes, and large birds in long strokes. The drawing appears to be more realistic due to light shading on the belly, under the wings and around the neck.
Step 6: Final Shading and Finishing Touches
Shadows and highlights Complete your drawing with shadows and highlights. Lightly shadown along the wings and the tail to give depth. Darken the beak, eyes and feet in order to contrast. The last sketch can also be outlined using a darker pencil or pen.