How to Draw Spiderman: A Step-by-Step Beginner’s Guide
-
Fatima Saif
- . December 5, 2025
- . Update: December 5, 2025 1:48 am
How to draw Spiderman is a very thrilling type of learning among the lovers of the superheroes of the Marvel, and the learners who are developing their skills in sketching. The dynamic posture of Spiderman, his expressive mask, powerful shape and recognizable web pattern make him a good subject to use in practice. Here, you will find the instructions on how to draw Spiderman step by step with the use of simple shapes, clear outlines, and easy methods of detailing your drawings. You may be drawing just to have a good time, with fan art, or you may want to master the basics of drawing, this exhaustive resource on how to draw Spiderman will see you make the neighborhood superhero come true.
1. Understanding the Basics of How to Draw Spiderman
It is best to know the structure of Spiderman, his proportions and his signature style before you start. In learning to draw Spiderman, simple shapes should be used as a starting point. Spiderman is an athletic character and is made up of thin and muscular body, thus the circles, ovals and guidelines will assist you to plot the body accurately. The mask has made his head a little bit long and the torso and limbs of this figure are shaped in a dynamic, flexible manner enabling him to look dynamic and strong.
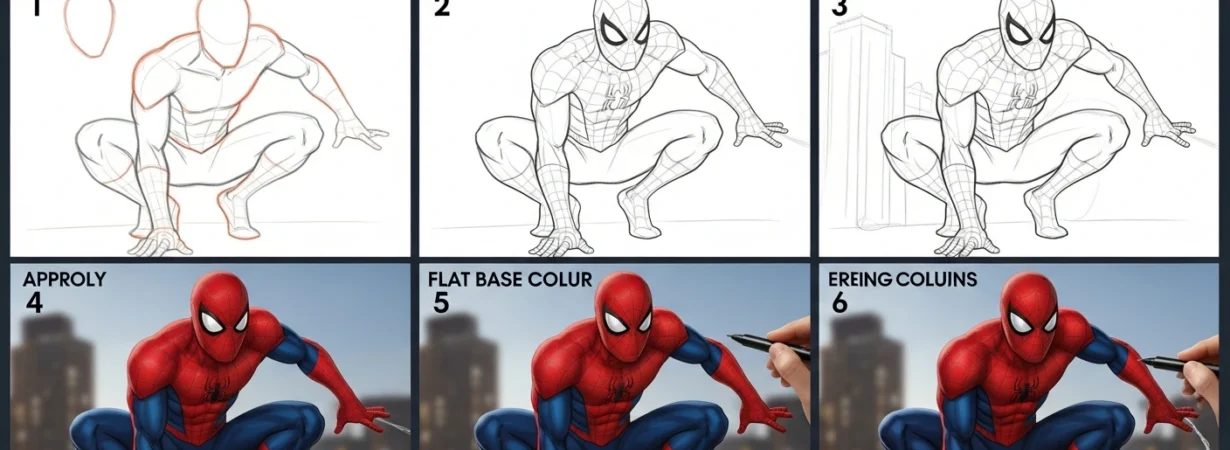
2. Step 1: Start With the Head and Mask
Start with a sketch of an oval shape of the head of Spiderman. Mark a vertical and horizontal line which will be used to put the eyes. One of the most familiar parts in the practice of drawing Spiderman is the mask and therefore do not hurry to make the big, expressive eyes. They must be broad and the end turned towards the outside and a little bit inwardly curved in the mask. After setting the eyes, make the outlines dark to give the effect of a comic style.
3. Step 2: Draw the Torso and Body Frame
Draw the upper body next in form of a rectangle with rounded off edges. Add circles to shoulders and associate them with lines that flow to make up the arms. Draw with long ovals the forearms and the wrists with smaller ones. It is important to remember that one of the most important aspects of learning how to draw Spiderman is to reproduce the athletic pose without making the body too massive. The appearance of Spiderman is also of a lean body structure as opposed to bulk.
4. Step 3: Shape the Legs and Pose
Draw in long lines to indicate the movement of the legs then repeat with ovals and curved lines thighs and calves. In case you want Spiderman to act, and you want him to jump or be on a certain position (squatting), then change the lines so that they have dynamic angles. To begin with the practice of how to draw Spiderman, it is better to start with simple standing position, and this will lead to the acquisition of confidence.
5. Step 4: Add Spiderman’s Suit Details
The design of the Spiderman suit is legendary and incorporation of such details in the right manner makes your drawing alive. Start with the big spider badge in the breast. The web pattern on the upper body and mask: then draw the pattern of the web. The web lines originate in the centre and go outwards in a curved direction. Being taught to draw Spiderman, you have to be patient, the web detailing can be quite time-consuming but it provides the drawing with the natural superhero appearance.
6. Step 5: Inking and Coloring the Final Artwork
After all the outlines appear cleaned, sketch the pencil sketch using a darker color. Removal of residual directions is done delicately. Next use bright red and deep blue color to paint Spiderman. Adds shadows to the muscles and the highlights to the mask giving it a dramatic comic-book effect. This is the last step in doing the colors, and your process of learning how to draw Spiderman is over!