
How to Draw a Rose: A Simple Step-by-Step Guide for Beginners
-
Khalid Al Mansoor
- . December 7, 2025
- . Update: December 7, 2025 1:51 am
Learning how to draw a rose can feel challenging, but with the right techniques, anyone can master it. It is important whether you are preparing to join art school, sketching as a hobby, or doing research on flower illustrations; the structure of a rose is important. This guide will help you draw a rose using simple shapes, layering techniques, and easy strokes—making it perfect for beginners and intermediate artists. By simplifying it into easy steps, you will know how to follow the curves, petals, and shades that give roses their gorgeous appearance. Follow this tutorial to confidently draw a rose from scratch.
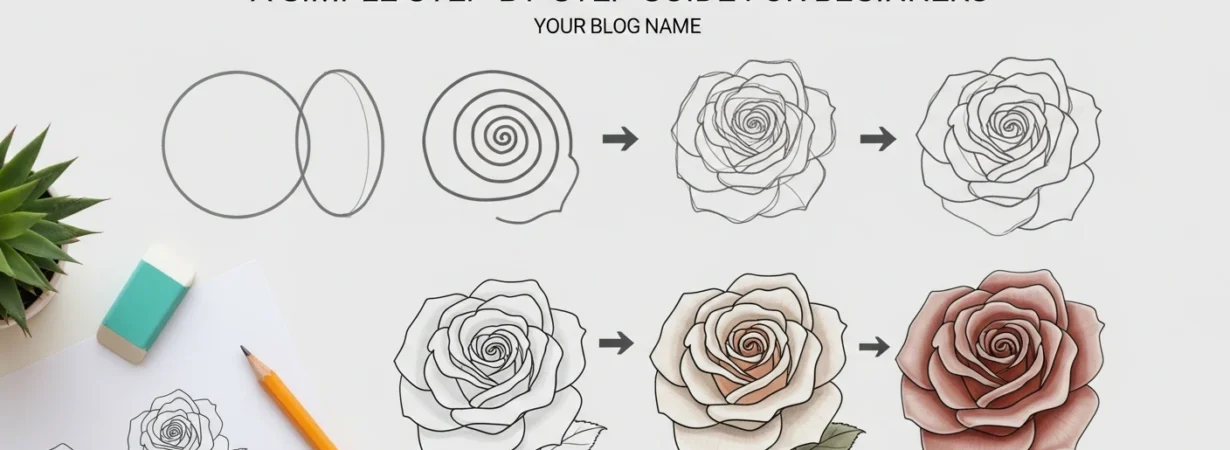
1. Start with the Basic Shape as the first step to draw a rose
You should start with a simple circle before you start adding some details. This is the central place of the flower. Drawing a loose spiral inside the circle will help you draw a rose with a natural center. There is nothing to be worried about being perfect; these first lines are construction marks. The idea is to imagine the way in which the petals will wrap around the center. One should use soft strokes of the pencil in order to correct the shape in the future. Many beginners skip this step, but creating a base form is essential to learning how to draw a rose accurately and beautifully.
2. Build Out the Inner Petals
The center spiral should be drawn, after which you should start drawing the inner petals around it. Imagine them to be curved teardrops that are embracing the center. The petals are to overlap in a gentle way, one with another, in order to recreate the natural stratification of a rose. At this point, do not over-crowd the design; the petals must be soft, small, and a bit uneven. This helps you draw a rose that looks realistic rather than stiff or symmetrical. And your drawing will begin to assume shape as you add the layers, and make the flower appear three-dimensional and in motion.
3. Expand to the Outer Petals
Now draw it outward. Outer petals are bigger, more open, and looser. Draw curved lines that bulge out to indicate openness. When learning how to draw a rose, remember that petals should not look identical; the beauty lies in irregularity. Added are gentle curves or slight bends so that the rose also looks natural. Your rose must now slowly start to bulge out and be more three-dimensional. Keep on changing and perfecting until the shape of the outside seems to be balanced and natural.
4. Add Details and Definition
In order to make your rose alive, start darkening the main lines of the petals and remove some of the marks of the construction that were not necessary in the initial stages. Draw in little curves to show folds, edges, and overlaps. This is used to make the rose appear delicate and detailed. Artists who want to master how to draw a rose should observe real roses or reference images to understand textures and natural imperfections. The inside of the petals can be given a touch of light to depict depth and provide the rose with a realistic touch.
5. Finish with Stem and Shading
You will need to draw on a thin stem and this will be connected to the ground and you would have your two or three leaves to complete your picture. Rose leaves are usually sharp with minor serrations. Shadow on overlapping petals to make it deeper. Use dark-to-light to provide the rose with the 3-dimensional effect. This last shading process is important to any person who is learning to draw a rose with professionalism. Time must not be wasted at all and add more layers in a bid to have a more blended and lighter appearance.


