How to Draw a Tree: A Step-By-Step Guide for Beginners
-
 Fatima Saif
- . January 3, 2026
- . Update: January 3, 2026 8:32 pm
One of the most important skills that one needs to master in sketching and illustration of nature is learning how to draw a tree. Trees are visible in the landscapes, cartoons, realistic art, as well as abstract designs. Although they might appear complicated, it is easy to draw a tree when you get to learn its structure, shapes and natural flow. The guide has simplified the process into simple steps, easy to follow by a beginner, such as drawing the trunk, illustrating the branches, leaves, and texture. It is not only the school projects but overall drawing confidence too that will see your ability to draw a tree greatly increase, whether you are drawing just to have fun or to simply improve your skills.
https://www.youtube.com/watch?v=a1X4G4VqRqs
Understanding the Basic Structure Before You Draw a Tree
You should look at the way the real trees grow before you start drawing a tree. A tree normally comprises a trunk, branches, and foliage. Its trunk is a base, with branches dispersed irregularly, and with the leaves at the apex.
Begin with the light strokes of a pencil. Connect the trunk with a simple vertical line, which is a bit wider at the bottom and narrower at the top. Do not use straight lines exactly; trees are not made in straight lines, and minor curves make the drawing look more natural. After the trunk is fixed, draw a very light sketch of the main branches that are going out of it.
Directions on How to Draw a Tree
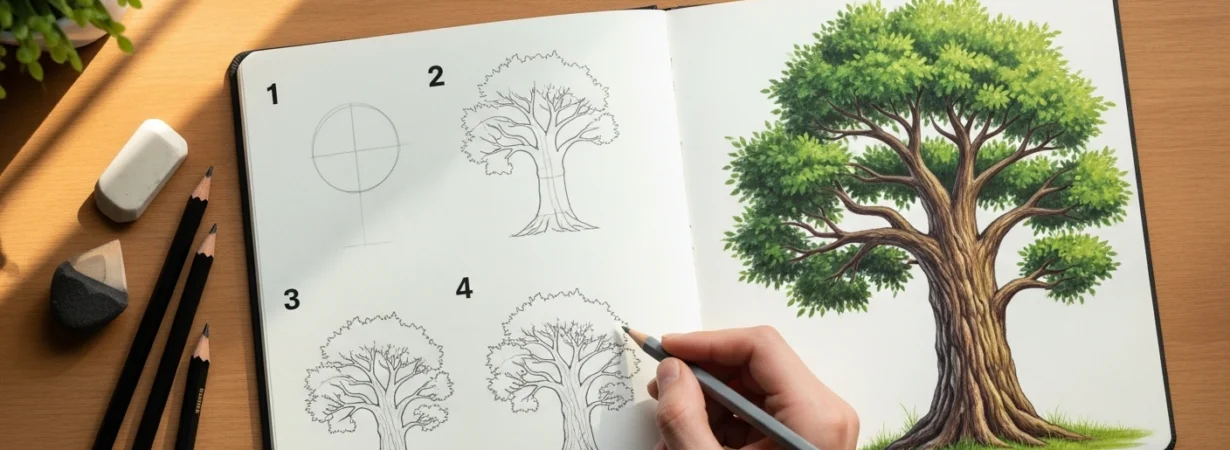
1. Sketch the Trunk
In order to draw a tree, one should start with the trunk. Take two slightly bent vertical lines that taper at the bottom. This causes the tree to be stable and to have a natural look. The hinting of roots can be done by small lines outwards at the bottom.
2. Add Main Branches
Thick branches, which separate into thin ones, grow outward, beginning at the top of the trunk. It is important to bear in mind that branches do not grow in a straight direction, but upwards and outwards. The process is essential in learning how to create a tree in a realistic manner.
3. Create Smaller Branches
Branch off smaller ones from the main ones. These become thinner as they get longer. Do not be symmetrical–surrealism is a characteristic of a drawn tree.
4. Draw the Foliage
Now sketch the leaf canopy. Do not outline the branches with individual leaves, but in the cloud shapes all around them. This method will render the simplification of the process and will make your drawing cleaner.
5. Add Texture and Details
To make it look more realistic, you can put some texture on your bark with some short, irregular lines on the trunk and the branches. The coloring, on one hand, brings depth and makes the drawing prominent.
Various ways of Drawing a Tree
Several methods exist for drawing a tree, depending on your style of art:
- Drawing of trees in real life: Use thin lines, shadows, and placement of the branches correctly.
- Cartoon Tree Drawing: Employ thick lines, unnatural forms, as well as simple leaves.
- Minimalist Tree Drawing: Minimalist drawings last longer and are clean and modern, using basic lines and shapes.
- Experience with a variety of styles will enhance your knowledge of how to create a tree using different artistic situations.
Common Mistakes to Avoid When You Draw a Tree
The most frequent mistakes that many beginners make are that they draw a tree badly:
- Strausses and stiff branches draw.
- Excessive symmetry of the tree.
- Crowding results in disorganised leave.
These errors can be readily corrected by seeing real trees and drilling a lot.
Why Practicing How to Draw a Tree Improves Your Art
Drawing a tree will help you to strengthen your observation skills, hand control, and knowledge of natural forms. The trees can be seen in landscapes, fantasy, and background images, and this makes them a useful subject for all artists.